How To Dramatically Improve Your Squat
Jun 21, 2016The human body is an impressive and complex system. We are resilient, quick learners and infinitely adaptable. We also have had technological changes occur very quickly that have changed the day to day of many of us. This day to day currently involves large amounts of sitting and very little non-exercise based movement.
In our attempts to restore our movement patterns one of the first areas that is addressed is mobility. If you have issues squatting, we mobilize your ankles and your hips. If you can’t press overhead, we mobilize your shoulders and your upper back. But, what if that problem isn’t a mobility problem?
Here’s an example of a change we were able to get with one of our athletes in about 20 minutes with no mobility work at all!
Before After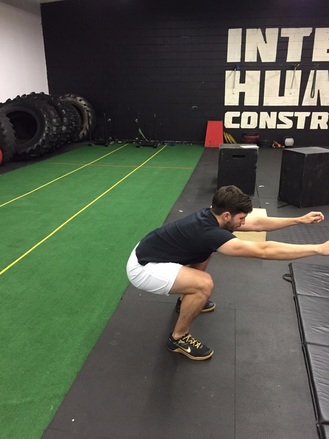
I have had this scenario come into my clinic frequently: A 30-40 year old ex-athlete that is still very active doing CrossFit or training for a triathlon/marathon. They sit all day and have had a sedentary job for a very long time. They get into loaded squats because they have read in multiple publications that say squats are a great way to build strength (which is true). Their knees and lower back now both hurt them when they do loaded squats. They stumbled onto a video of Kelly Starrett talking about mobility for the hips to improve the squat. They start mobilizing their hip with a big green jump stretch band and do so daily for a few months. Very little change occurs and they get frustrated.
This person eventually ends up in my office seeking out a better mobility plan. What mobility techniques should they do and how much MORE per day do they need to do? What other ways can they smash their tissues into submission so they can finally have a normal squat again?
One of the first things I want to delve into when I see a case like this is what type of movement work have you been doing? Is there any prioritization of moving into the new range they are working on after mobilizing? Do they have any huge roadblocks that we need to address, i.e. surgery from 10 years ago to the knee that was never fully rehabbed.
Once those questions are answered, I want to assess their squat in an unloaded position. I will look at a few areas: The ability to get the hip into flexion; the knee into flexion (this is rarely an issue); and the ankle into enough dorsiflexion that we can achieve a parallel depth squat.
For hip flexion, you can use the supine test in the picture below. Leave one leg out straight and pull the other leg up to your chest. You can even use your hands to pull the knee to towards the chest. Once you feel like your butt is coming off the table, that's all the room you have in that hip. We’d like to see 125 degrees in this direction. In order to achieve a parallel squat, you really only need about 90-100 degrees.
Picture courtesy of MHHE
For the ankle, I’ll have my patient do a quick wall test. They can either do this standing or kneeling. With your foot in contact with the ground, drive your knee forward toward the wall. You want your knee to be able to touch the wall with the front of your foot 3-5 inches away. The farther away you get, the more mobility you have in the ankle.
Often, both of these correlation tests are passed showing enough movement availability to be able to perform the squat correctly. We’ll do one last test with them to see what the squat would look like unloaded in a hands and knees position.
In the picture below, the athlete is assuming what is called the quadruped rocking position. If you were to rotate the picture, this athlete would look like he was in a variation of a squat. This is an unloaded way to assess someone's ability to get their hip to parallel, or past, and see if they are able to maintain spinal neutral. His toes are up to mimic ankle dorsiflexion in the squat as well. Once I assess this and an athlete shows the capacity to get as far back in a quadruped position as the picture shows (hip crease farther back than the knee), we can move on to fixing this.
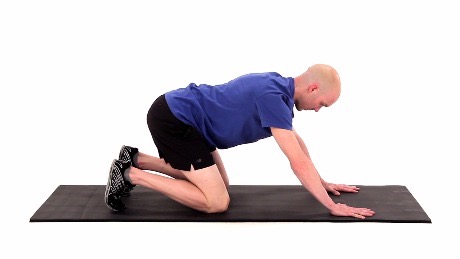
Picture courtesy of Foundry Sports Medicine
Here’s a list of all the information we’ve gathered so far:
-They have sufficient hip flexion to achieve a squat.
-They have sufficient ankle dorsiflexion to achieve a squat.
-They have the capacity unloaded to maintain a neutral spine in a squat form (in quadruped).
At this point I can be pretty confident that this is not a problem that is going to be solved with crushing a lacrosse ball into their hip or band distracting their ankles. This is a control problem and it requires a completely different approach to restore the pattern.
This is where motor control work comes into the equation. Motor control simply put is technique. Here’s a more specific definition of motor control as well.
Motor control is the process by which we use our nervous system (brain, spinal cord, nerves) to activate and control the muscles/limbs involved in the performance of a skill.
So how do we get better at motor control? The answer is practice, in particular, blocked practice when we are trying to master a skill.
If you’ve played a sport, you’ve done blocked practice. Blocked practice is fundamental work. If you were a basketball player, you could improve your skills by just playing a bunch of pick up games. If you wanted to be a really good basketball player, you wouldn’t just do that. You would spend time working on dribbling with your non-dominant hand. You’d practice shooting free throws for hours. You’d practice the subtle nuances of a bounce pass vs a chest pass vs a lob pass. These are individual components of the overall game and you practice them individually so you can master the fundamentals. This is the most effective way for beginners to learn a new skill, but it’s also very effective for advanced athletes to maintain their mastery of the skill.
For the purposes of this article we will assume we are all beginners because the reality is many of us NEED to relearn this skill. Sadly, we were all probably much more efficient squatters when we were 5 years old and now we need to relearn that skill.
We’re going to start with breathing because it’s one of the most underrated portions of the squat and it has a dramatic effect on hip/spine positioning.
To start with, we will have athletes assume what is called the 90/90 position. This is essentially an unloaded squat pattern. We want our athletes to adopt a position similar to what they are trying to improve. We’ll try and get 10 reps through on this exercise prior to any other squat practice. It’s a great way to feel what we want our rib cage to feel like when we are squatting. It’s an easy way to also get a little prep work in for the diaphragm which is also a major stabilizer of the spine. Watch the video below for a more detailed explanation of this drill.
Step two is we want our athletes to understand how we want them to organize their spine during the actual squat movement. Here’s the general explanation I use:
First, I like to cue thinking about creating a steel tank and then pressurizing it with air. Think of a propane tank as an example. Our torso should be the steel tank and the air you breath in should pressurize it.
Here are the steps:
-Squeeze your butt.
-Screw your feet into the ground.
-Take a big breath in and blow all the air out until you feel like your ribs are pulled down flat with your abdominal muscles.
-Maintain tension and breath into it.
The amount of tension you need is dictated by the task. For example, if you’re squatting something really heavy, you want to have a lot of tension. If you’re doing a bodyweight squat, you do not want or need a ton of tension. You want just enough to be able to complete the movement safely and effectively.
Now that we have breathing down and we have an understanding of how to brace our spine, it’s time to move. We’ll start with something unloaded and then move to a somewhat loaded exercise. Also, just to be clear, this is not your workout, this is practice. Treat this as practice, take it seriously and your squat will improve dramatically.
The wall squat, “squat therapy”: For this drill I’ve picked a video that Rich Froning himself put together. I think this video does a good job of demonstrating a commonly used squat drill. As an added bonus, Rich is not wearing a shirt - you’re welcome!
One subtle change I like to make to this drill, is to have my athletes pause half way down. They will pause, take a big breath in, both the air out and then breath back into the tension they create. This is essentially making them go through the torso bracing sequence twice during the squat. If you feel your spine shift significantly when you do this, chances are you are over extending your lower back. We want your spine in neutral, not in a extremely arched lower back position. Your lower back should not look like a banana!
Also, make sure to pause in the bottom and control that position. Imagine you are hovering over the grossest toilet in the world! This should be a very active position in the bottom of the squat.
Start by performing 10 of these squats a comfortable distance away from the wall. It should take you 3-5 seconds to descend, pause for 3-5 seconds and stand up in 1-2 seconds. Next, move a little closer to the wall so it’s moderately challenging for you to hold the position. Perform 10 more repetitions with the same tempo as the first 10. Lastly, move a little closer to the wall so it’s difficult for you to maintain the squat position. Again, use the same tempo. Don’t rush this, the struggle is where progress is made!
For the next drill we’ll throw in some real nervous system trickery! We’re going to use a band to help create something called Reactive Neuromuscular Stabilization. It’s a big term for exaggerating the problem.
Ever wonder why your coach or PT has you squat with a band around your knees? Well, it’s because if we force you into a bad position, the body naturally tried to correct it by firing in the opposite direction. So if we pull your knees in with a band, your body with activate the hips to engage the knee outward into the pressure.
We’ll do the same thing with your torso to help correct excessive forward leaning. In the video below, I explain how I use this with my patients. I show this with one arm at a time but you could absolutely do it with both arms at the same time.
Keep the same tempo as the squats above for this one. That would be 3-5 second decent, pause 3-5 seconds, and then stand up in 1-2 seconds.
It is also very important that you maintain control of your torso/spine while you do this. We are not trying to reinforce a bad pattern of firing too much into spinal extension. Video yourself from the side just to make sure you don’t instantly start the movement by overextending your lower back.
Perform 2 rounds of 5 reps on each side.
Lastly, let’s get some weight in your hands. We’ll use a dumbbell or kettlebell as we do a squat variation called a goblet squat.
The goblet squat is one of my favorite squat training drills. I’ve heard some coaches say they hate the goblet squat and that’s mainly because you are semi-limited on how much weight you can load with. For the purpose of building pure strength, there are definitely better squat options. For learning/improving the loaded squat pattern, I think the goblet squat is the best squat variation.
A few things happen with the goblet squat that are interesting. First, we add weight to the body in front of the torso. This creates a really unique counterbalance that allows us to be more upright and sit down a little bit deeper into the squat. It also creates some inherent need for “anterior stability” or tightness in the abdominal region. Loss of control in the abdomen is one of the biggest faults I see in loaded squatting. It creates countless issues in the hips/back/knees and can be retrained well with the goblet squat.
Pick a semi-light weight but something heavy enough to counterbalance you. 10 pounds will probably not be enough for most people but grabbing the 100 pound meatball kettlebell isn’t the best idea either.
Once you pick the up the kettlebell go through the same bracing sequence we talked about earlier:
-Squeeze your butt.
-Screw your feet into the ground.
-Take a big breath in and blow all the air out until you feel like your ribs are pulled down flat with your abdominal muscles.
-Maintain tension and breath into it.
Perform 10 reps at a faster tempo than our unloaded squats. Try 2 seconds on the decent, pause 2 seconds and then stand up. We’ll go through this two rounds as well.
Here’s the prescription:
3x per week perform this practice session:
1 round not for time
-90/90 breathing 10 reps, 5 seconds in, pause 5 seconds, exhale 5 seconds
-30 reps wall pause squat to a target, getting closer to the wall after each sequence of 10 reps
-Overhead RNT banded pause squats 2 rounds 5 reps each side
-Goblet pause squat light to moderate weight 10 reps
So, when can you plug this into your training? You have a few options, but in my opinion it’s best to do this prior to a training session. Think about incorporating this into part of your warm up on squat days. If we go back to the basketball reference, it would be like practicing shooting from different spots around the 3 point line prior to a game. There is a carry over effect in that motor pattern to the actual game where you have less than ideal conditions(people trying to stop you from shooting).
Practice the skill and then use the skill. Your workout is the game but your practice is what makes you dramatically better.
Step one is to help tease out if you have a mobility problem or not using the tests we described in the beginning of the article. If you don’t have a mobility restriction, then it’s time to practice the movement. Give it a solid 4-6 weeks of practice and see how much more comfortable it feels to squat.
Don’t spin your wheels thinking you have a mobility problem. It’s not always the case and movement really is medicine!
-Dr. Danny, PT, DPT, OCS, CSCS
Still have questions? Contact us at [email protected] to see how we can better help you.
Let us help you figure out to live your best active life today!
Remember, Movement is Medicine!
