Preventing Back Pain While Deadlifting, Pt. 1: The Set-Up
Jul 13, 2018
On average 80% of Americans will experience low back pain at some point in their lives and more than a quarter of the population currently deals with low back pain on any given day. Not only do most people have some form of back pain, but it many cases it is the result of poor movement patterns that have been abused for years causing the root of their problem to be both incredibly complex and multifactorial.
An exercise once thought to be dangerous (something that has been debunked by a multitude of recent studies), there is arguably no other lift that is more functional than the deadlift. The deadlift is a hinge type movement pattern, which is used every single time you bend over to pick something up off the floor, so you better be efficient with this movement. This article is Part I of a two-part series covering the common mistakes I see in the clinic and will teach you how to prevent low back pain while deadlifting.
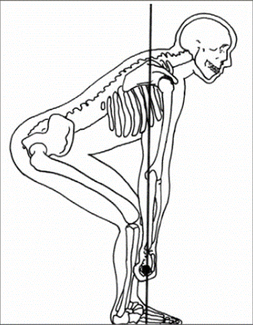
This exercise can be moderately complex to perform correctly and the number one mistake that I see most in the clinic is a poor set up. There is a lot that goes on to get into this position but by bringing your shoelaces to the bar and remembering the “3 B’s” (Bow, Bend, Blades), most people will be able to get into a solid starting position.
- Bow: Bowing forward until you feel tension in your glutes and hamstrings is the first and arguably most crucial step to setting up your deadlift. This is the hinge movement pattern referenced above and by doing this movement correctly you’re protecting your spine by keeping it in a neutral position and putting your posterior chain (glutes and hamstrings) in optimal position to perform the deadlift. To ensure that you're “bowing” (aka hinging) correctly, check out this drill below:
- Bend: Once you bowed forward and feel tension in your posterior chain, the next step to a proper deadlift is to bend your knees to where you can grip the bar. THE MOST IMPORTANT part of this step is that while you bend down to the bar, you maintain the tension you created previously in your posterior chain. By doing this you’ll not only keep the appropriate muscle groups activated to perform this perform this movement, but you’ll also be much more likely to have your hips in at an optimal height (not low like a squat) which will allow you to keep you shins in a vertical position. This is crucially important and is something we’ll get into more in part II of this series.

- Blades: Once you’ve gripped the bar, the last phase to getting into a good set up position is to “throw your shoulder blades into your back pocket.” By doing this movement you activate your latissimus dorsi which is important for a couple of reasons:
- Your lats play a direct role in creating lumbar stabilization due to their connection with the low back via something called the thoracolumbar fascia
- By creating tension at your lats you’ll be able to keep the bar much closer to your body while standing up with the weight, protecting you lumbar spine and boosting your performance.
So in review, to be in a good set-up position you need to “bring your shoelaces under the bar," bow until you feel tension in your posterior chain, bend your knees until you can grip the bar, and engage your shoulder blades. Doing this will get you into a good set-up position, which will protect your low back and allow you to lift bigger weight.
Thanks for reading,
Dr. Jacob, PT, DPT
Let us help you figure out to live your best active life today!
Remember, Movement is Medicine!

